If you want to know how to keep mice out of your home, start by understanding that it’s less about luck and more about knowing where to look. You hear it late at night: a faint scratching sound behind the wall near the stove. Or you pull out the bottom drawer in your kitchen and find a cluster of small dark droppings. Either way, your stomach drops. Mice are fast, quiet, and remarkably good at exploiting the exact gaps most homeowners never think to check. The good news is that keeping mice out of your house isn’t complicated once you know where to look and what actually works.
At Rock Pest Control, we’ve inspected hundreds of Kansas City homes for rodent entry points, and the problem spots are almost always the same. A gap behind a dryer vent. Worn weatherstripping on a side garage door. An unsealed pipe penetration under the kitchen sink. Most homeowners don’t find these spots because they’re not looking in the right places. This guide walks you through the full process: confirming whether mice are already inside, sealing off their entry routes, cutting off what’s attracting them, and knowing when to stop fighting alone and call a professional.
How to Tell If Mice Are Already in Your Home
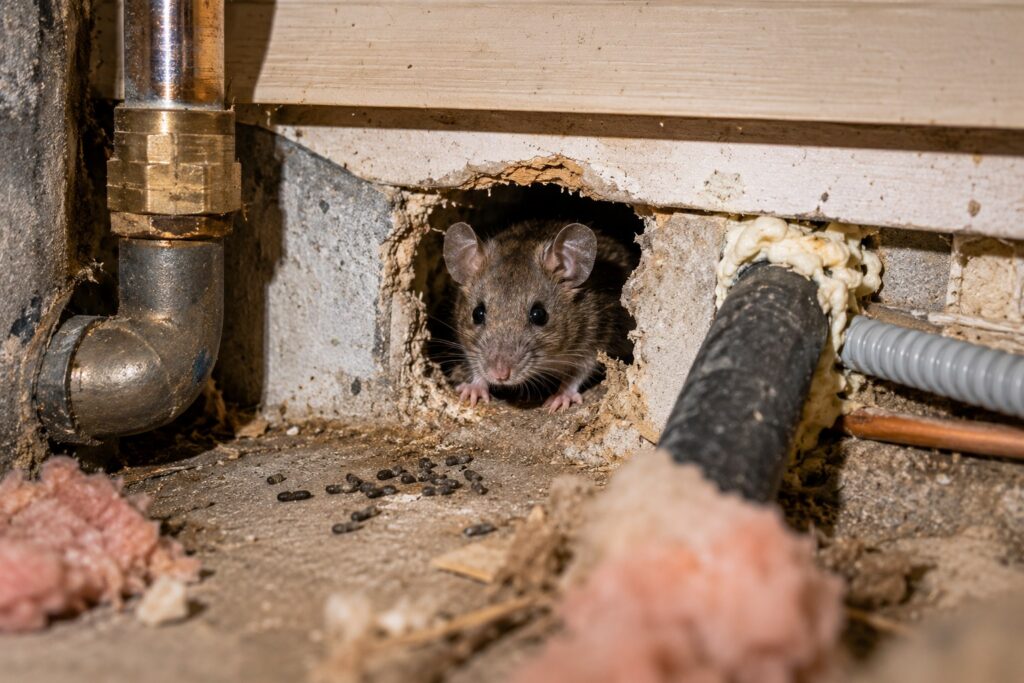
Before you seal anything or set a single trap, figure out what you’re actually dealing with. The most reliable sign of an active infestation is fresh droppings: small, dark, and slightly moist, roughly 3- 6 mm long. You’ll also find greasy rub marks along baseboards and walls, which mice leave behind from the oils in their fur as they travel the same paths repeatedly. Gnaw marks on wood, food packaging, or even electrical wiring, along with shredded nesting material pulled from fabric or insulation, are additional red flags. A faint musky odor that you can’t quite place is often the first thing homeowners notice before they ever spot droppings.
Distinguishing fresh activity from an old problem matters because it changes what you do next. Fresh droppings are dark and moist; droppings that are several weeks old dry out, turn gray, and crumble when touched. A light musty smell suggests a small or early-stage problem. If you’re picking up a strong ammonia odor and finding droppings spread across multiple rooms, the infestation is well-established and has been running longer than you realize.
Where to Look First: A Quick Room-by-Room Inspection
Grab a flashlight and start in the kitchen. Check under the sink, behind the refrigerator and stove, and inside lower cabinets. These spots are warm, close to food, and typically undisturbed for long stretches. Move to the pantry and inspect any cereal boxes, flour bags, or pet food containers for gnaw holes and spilled crumbs along the shelf edges. From there, go to the basement and walk along the foundation walls, checking the corners where walls meet the floor and any areas with stacked boxes or stored furniture.
The laundry room and attic are two spots homeowners routinely overlook. In the laundry room, check behind the dryer and around the dryer vent opening where it meets the exterior wall. In the attic, look along the beams for droppings and scan the insulation for areas that appear disturbed, shredded, or compressed into loose nests. Pay close attention to the low corners and any place where a pipe, conduit, or wire passes through a wall or floor.
What Active Mouse Activity Looks Like vs. Old Signs
Fresh activity follows a pattern. Droppings appear in the same concentrated areas day after day. Greasy smudge marks along baseboards are consistent and show up on the same narrow paths the mice travel every night. If you wipe an area clean and find new droppings within 24 to 48 hours, the mice are still present and active. Recent gnaw marks reveal lighter-colored wood beneath the surface because the damage is fresh.
If everything you’re finding looks dusty, the droppings crumble when you disturb them, and you can’t reproduce any new activity after a few days of monitoring, the infestation may have resolved on its own, or the mice have shifted to a different part of the structure. In either case, the entry points are still open, which means new mice can move in anytime conditions push them to look for shelter indoors.
How to Keep Mice Out of Your Home: Seal Every Entry Point
You can trap mice indefinitely, but if the holes they’re using to get inside stay open, new mice will keep replacing the ones you catch. This is the single most common reason homeowners feel like they’ve “tried everything” and still have a mouse problem. A house mouse can squeeze through a gap as small as 1/4 inch, roughly the diameter of a pencil. That’s a smaller opening than most people picture, and it means gaps that look insignificant are real entry points.
Mice also follow scent trails left by previous mice, so once a route is established, it keeps getting used. Sealing those points doesn’t just block the current infestation; it breaks the cycle. Traps, repellents, and bait are all tools for managing mice that are already inside. Exclusion, the process of physically blocking every gap a mouse can use, is the permanent fix. Everything else is damage control. Mouse-proofing your home starts here, and it’s the step most homeowners underestimate.
The Most Common Entry Points in a Typical Home
In older Kansas City homes, the most consistent problem spots are the same ones created by age, settling, and years of repairs. Gaps around utility pipes, gas lines, cable conduit, and HVAC penetrations through exterior walls are near the top of the list. Foundation cracks, weep holes in brick homes, and gaps at the sill plate where the wood framing meets the foundation are close behind. Worn or missing weatherstripping on doors, gaps under garage doors that have settled, and dryer or HVAC vents without proper covers are all common culprits.
Inside the house, the space under the kitchen sink is one of the highest-priority areas. Plumbing pipes pass through the floor or wall, and the gaps around them are often large, dark, and hidden from view. None of these openings have to look big to be a problem. A gap around a pipe that looks like a minor cosmetic issue is functionally wide open from a rodent’s perspective. Sealing your house from mice means tracking down every one of these spots before the weather turns cold.
Choosing the Right Material for Each Gap Type
The core rule is metal first, sealant second. Mice can chew through foam, plastic, and most soft materials, so foam or caulk alone isn’t a durable fix. For small gaps around pipes and wires, pack steel wool tightly into the opening, then seal the edges with exterior-grade caulk or pest-resistant expanding foam so the steel wool can’t be pulled out. Recessing the wool slightly into the gap before sealing gives the caulk a clean edge to adhere to.
For larger openings, vents, crawl space gaps, and damaged foundation screens, use 1/4-inch galvanized hardware cloth cut to size and fastened mechanically to the structure. Seal the perimeter edges with caulk or foam after the mesh is secured. For irregular pipe penetrations where the gap shape is hard to fill cleanly, pack copper mesh or steel wool first, then fill around it with pest-resistant expanding foam. That combination handles the gnaw risk and closes off airflow through the gap at the same time.
How to Keep Mice Out: Remove Food Sources and Attractants
Sealing gaps is futile if your home is still offering everything mice need to survive. Two things drive them inside: food and harborage. Mice need roughly 3 grams of food per day, which means even small, consistent food sources are enough to sustain a population. They also need nesting material and protected spaces to build in. Address both, and you make your home significantly less appealing before the first cold snap of the season pushes rodents to start probing new structures.
In Kansas City and across the Midwest, that pressure starts building in late September as outdoor food sources dry up and temperatures drop. Homes near drainage areas, green spaces, and neighborhoods with mature tree cover tend to feel this earlier than others. Getting ahead of attractants before October is the practical window that most homeowners miss.
Food Storage Habits That Invite Mice
Move dry goods out of their original packaging and into airtight containers. Cardboard boxes and thin plastic bags aren’t a barrier for mice; they’re a starting point. Cereal, flour, rice, pet food, and birdseed are all high-value targets that need to be stored in glass or heavy-duty plastic containers with secure lids. Don’t leave pet food out overnight, and clean up crumbs and grease from behind and under appliances consistently, because buildup in those areas is easy to miss and accumulates fast.
The kitchen floor under the stove and the back corners of lower cabinets are worth cleaning more aggressively than most people do. Grease residue and scattered crumbs in those spots provide enough food to support mice for extended periods. A thorough clean of those areas, combined with proper food storage, removes a significant portion of what’s making your home worth entering in the first place. Eliminating these mouse attractants is just as important as sealing gaps.
Clutter, Nesting Material, and Yard Habits
Mice build nests from whatever soft material they can find: shredded cardboard, fabric scraps, paper, insulation, dryer lint, and upholstery stuffing are all prime choices. Stacked boxes in a basement or storage room function as both a nesting site and a launching point for deeper intrusions. Reduce clutter in storage spaces, keep fabric-based items in sealed containers or off the floor, and clear out any cardboard that’s been sitting untouched for months.
Outside, firewood stacked directly against the house gives mice a covered route to the foundation and a place to shelter before they make entry attempts. Move woodpiles away from the structure and store them off the ground. Keep vegetation trimmed back from the foundation, and don’t let leaf piles accumulate against the exterior walls in fall. These aren’t cosmetic recommendations; they eliminate the covered positions mice exploit before working their way inside.
Winter Rodent-Proofing Tips for Kansas City Homeowners
In Kansas City, mice start probing homes more aggressively as temperatures drop below 50°F. October and November are the peak months for new intrusions, though the risk stays elevated through March as long as outdoor conditions remain inhospitable. Homes near green spaces, creek corridors, and older neighborhoods with mature landscaping face more pressure than average. A targeted fall inspection and a few hours of prep work can prevent a problem that would otherwise run all winter.
The seasonal vulnerabilities that often get missed are subtle. Garage doors settle slightly in cold weather, widening the gap at the bottom. Weatherstripping that was borderline serviceable in summer becomes a real opening when the material stiffens and contracts. HVAC components installed or serviced in summer may have unsealed penetrations that nobody thought to check before the temperature dropped. These are the gaps that need attention in September and October, before mice are actively looking for them.
When Kansas City Homes Are Most Vulnerable to Mice
The critical window in the Kansas City metro runs from mid-September through November. That’s when outdoor food sources decline, field populations of mice start dispersing, and the search for warm harborage becomes urgent. Homes near drainage ditches, open lots, parks, and tree lines experience this earlier and more intensely than homes in denser neighborhoods. If you’ve had a mouse problem in a previous fall, treat the following September as your deadline for getting exclusion and prevention work done, not your starting point.
A Fall Rodent-Proofing Checklist Before Winter Hits
Think of this as a one-afternoon project that prevents a three-month headache. Here’s what to cover:
- Inspect all exterior door sweeps and replace any that show light underneath or have visible gaps at the corners
- Check and replace weatherstripping on side entry doors, including the door between the garage and the house interior
- Install or inspect covers on dryer vents and HVAC exhaust openings on the exterior
- Walk the garage door perimeter and check the rubber seal along the bottom for gaps or deterioration
- Inspect the foundation on all sides for cracks; seal them before freeze-thaw cycles widen them further
- Move firewood storage away from the house and clear debris from along the foundation perimeter
Freeze-thaw cycles are worth flagging specifically for Kansas City homeowners. A small foundation crack in October can open significantly by January as water freezes and expands inside it. Sealing cracks before the first hard freeze closes a vulnerability before it has a chance to worsen through the winter months.
Traps, Repellents, and Knowing When DIY Isn’t Enough
If mice are already inside, sealing and prevention need to run alongside active control measures. The most effective and cost-efficient indoor option for most situations is the standard snap trap. Set them along walls and baseboards, near signs of activity, and close to suspected entry areas rather than in open floor space. Mice travel along edges, not across open areas, so placement matters as much as the trap itself. Use peanut butter as bait, applied in a small amount directly on the trigger so the mouse has to engage with it to get to the food.
Use multiple traps at once rather than spacing them out sparingly. For any visible level of activity, deploy traps in clusters near active areas and check them daily. Wear gloves when handling traps to minimize human scent transfer and to protect yourself from potential pathogens in droppings or nesting material.
Traps That Actually Work and How to Place Them
For homes with children or pets, enclosed electronic traps are the better option. The killing mechanism is fully contained inside the housing, which eliminates the accidental contact risk that open snap traps carry. They’re more expensive per unit but worth it in households where snap traps would need to be placed in hard-to-reach or protected locations that reduce their effectiveness. Avoid glue traps entirely in homes with pets; they don’t discriminate, and the outcome is neither humane nor practical.
If you’re setting traps and catching mice consistently but the activity level isn’t dropping after two weeks, the entry points are still open, and new mice are replacing the ones you’re removing. That’s the signal to shift focus back to exclusion before continuing to trap.
What Natural Repellents Can and Can’t Do
Peppermint oil may discourage mice from a treated area briefly, but the effect requires constant reapplication and mice work around it without much difficulty. It’s not a strategy; it’s a minor deterrent at best. Ultrasonic devices generate a lot of marketing attention but have weak real-world evidence behind them. Any behavioral response mice show to ultrasonic frequency typically fades within days as they habituate to the sound, rendering the devices unreliable for sustained rodent control.
Use repellents only as a low-level supplement to a proper exclusion and trapping program, not as a replacement for either. If you’re relying on peppermint oil or a plug-in device as your primary mouse prevention tool, you’re not actually protected. The foundation of effective rodent control is physical: sealed gaps, removed attractants, and properly placed traps.
When to Call a Professional Rodent Control Company
There are clear signals that DIY methods have hit their limit. If traps keep filling but the activity level isn’t declining, if you’re finding evidence in multiple rooms rather than one concentrated area, if you hear scratching or gnawing inside the walls at night, or if you see a mouse during daytime hours, the infestation has grown beyond what surface-level trapping can realistically handle. Daytime sightings in particular suggest a population large enough that competition for food is pushing mice into the open during hours they’d normally avoid.
A persistent musky or ammonia odor that you can’t trace to a specific source means urine has built up enough to be detectable, which points to an established infestation with nesting activity happening somewhere inside the structure. That’s not a situation snap traps alone will resolve. Rock Pest Control offers free estimates within 24 hours and serves homeowners across the Kansas City metro, including Overland Park, Liberty, and Independence. A professional inspection identifies entry points and nesting areas that most homeowners miss on their own, especially in older homes where gaps hide in places nobody thinks to look.
The Short Version: Inspect, Seal, Remove, Control
Keeping mice out of your home comes down to four things done in the right order. Inspect first so you know whether you’re dealing with an active problem or preventing one. Seal next, starting with the highest-priority exterior gaps and working inward. Remove the food sources and harborage that make your home worth entering. Then add traps strategically for any mice already inside, and stay ahead of the seasonal pressure that drives rodents indoors every fall in Kansas City.
The homes that end up with serious infestations usually skipped one of those steps, most often the sealing. Trapping without exclusion is a treadmill. Prevent mice from getting into your house by closing the gaps first; everything else becomes much more manageable. If you’ve worked through the steps in this guide and you’re still seeing activity, or you want a professional set of eyes on your home before winter, contact Rock Pest Control for a free estimate. We’ll find what you missed and get it handled.