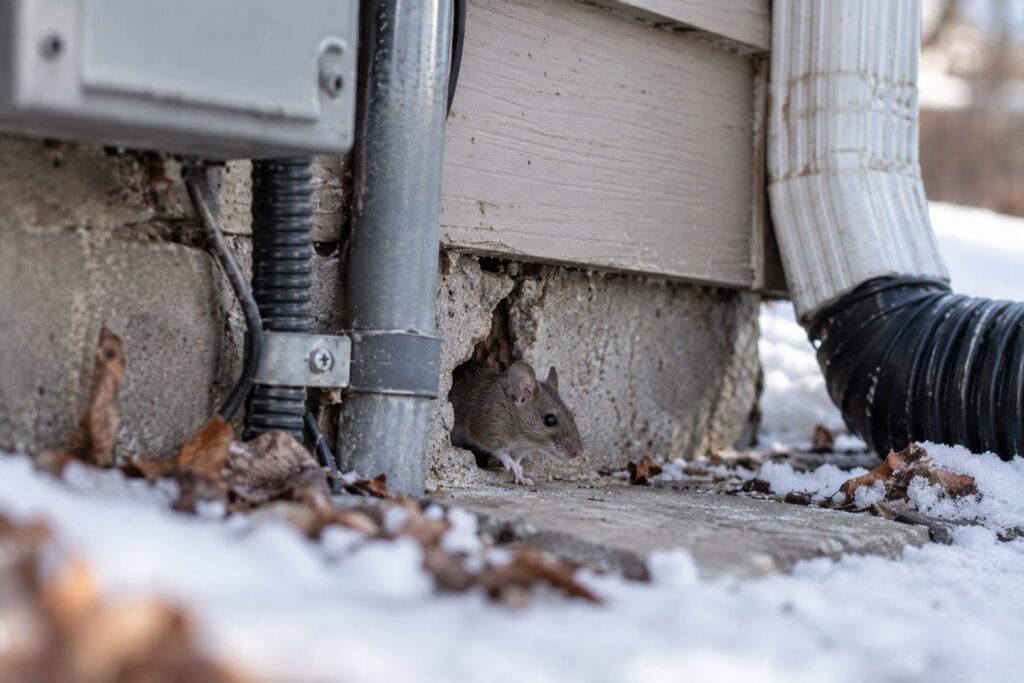
If you’re asking how to stop mice from getting into my house in winter, start with this: as nights cool into the 40s and 50s°F, mice are more likely to seek indoor shelter. They don’t hibernate, and they remain active year-round, intensifying their search for warmth, food, and cover as temperatures fall. They find small openings you haven’t noticed yet and move in before you see any sign of them.
Here’s the number that makes this real: a house mouse can squeeze through a gap as small as 1/4 inch. That’s roughly the diameter of a pencil eraser. A gap that small doesn’t look like much, but it’s enough for a mouse to pass through head-first, and once the head clears, the rest follows.
After years of rodent calls across the Kansas City metro every fall and winter, the team at Rock Pest Control sees the same entry points show up again and again. Foundation joints. Worn door seals. Vent covers with torn mesh. Gaps around utility lines that were never properly sealed. Many of these entry points are preventable with proper exclusion work done before the first mouse ever gets inside. This article covers where mice get in, how to seal those spots correctly, what to remove that’s drawing them in, and when it makes more sense to call a professional than to keep troubleshooting on your own.
How do I stop mice from getting into my house in winter? Start here.
They don’t hibernate; they relocate
Mice stay active all year. When outdoor temperatures drop, especially below 40°F at night, they shift from foraging outside to finding a stable indoor environment. The cold itself isn’t the only factor. They’re also looking for food, water, nesting material, and cover from predators, and a typical home provides all four without much difficulty.
Fall is when scouting behavior picks up. Mice start testing the perimeter of structures, probing gaps and weak points. By the time you notice droppings or hear scratching in a wall, entry has usually already been happening for a while. The visible signs tend to lag behind the actual activity by days or even weeks.
The areas of your home they target first
Attics are a common first destination. They’re warm, quiet, rarely disturbed, and loaded with insulation that makes ideal nesting material. Access usually comes through gaps near the roofline, damaged soffit vents, or openings at roof-to-wall transitions. Crawlspaces are similarly attractive because they’re low-traffic, close to utility lines, and often have direct access through foundation openings that were never properly screened.
Garages get overlooked because people think of them as already somewhat outside. But garage door seals wear down, clutter provides cover, and stored items give mice places to nest without being disturbed. From the garage, the path into living spaces is short.
Once mice are inside, walls become travel corridors between food sources and nesting spots. That’s why you can have signs in a kitchen and a bedroom at the same time; they’re moving through the structure, not just sitting in one spot.
How to find where mice are actually getting in
The 1/4-inch rule and how to use it during an inspection
The practical test is straightforward: if a pencil fits in a gap, treat it as a potential entry point. That threshold applies to cracks in masonry, gaps around pipes, worn door seals, and separations at joints. It’s a low bar by human standards, but it’s the right one for rodent exclusion and winter mouse prevention.
On an overcast day, or at night while standing inside the house, use a flashlight and scan around door frames, vent covers, and utility penetrations. Anywhere light leaks through, air moves, and mice can follow. Walk the full perimeter of your home slowly, starting at the foundation and working upward. Bring a pencil and probe anything that looks questionable. Mark the spots you find so you can seal them systematically rather than trying to remember where each one was.
The four zones where mouse entry points concentrate this winter
The foundation and sill plate is the first place to check. Look at the joint where siding meets the foundation, any cracks in mortar or concrete, and every point where a utility line enters the structure. These penetrations are often sealed poorly at installation and loosen further over time.
The eaves and roofline come next. Inspect soffits, gable ends, and roof-to-wall transitions for gaps or missing screening. These areas lead directly into attics, and they’re easy to miss because they require looking up and getting close.
Doors and windows matter more than most people expect. Close an exterior door and look at the bottom and sides. If there’s visible clearance at the base, even a small amount, that’s enough. Replace worn weatherstripping and add door sweeps where needed.
Vent covers are the last major zone: crawlspace, gable, soffit, and exhaust vents all need intact metal screening. Torn or absent mesh turns any vent into an open entry point and is one of the most commonly missed spots during a DIY inspection.
The right materials to seal gaps for mice, for good
Matching the material to the gap type
For small holes and pipe penetrations under about one inch, copper mesh packed tightly into the opening and then covered with exterior caulk is the most durable fix. Copper doesn’t rust the way steel wool does, and mice cannot chew through it. The caulk holds the mesh in place and closes off any remaining air gaps.
For larger openings, vent covers, and crawlspace gaps, use 1/4-inch galvanized hardware cloth cut to size and fastened mechanically. It holds up in exterior conditions, resists chewing, and stays in place long-term when installed correctly. Foundation and masonry cracks get a different treatment: a mortar or concrete patch is the most permanent solution. Once cured, it’s effectively chew-proof and won’t degrade the way flexible materials can. For gaps around door frames or irregular joints where surfaces shift slightly, silicone caulk works well once any mesh backing is already secured in place.
Why expanding foam is not the finish line
Expanding foam is easy to grab and satisfying to use, but it’s not a standalone mouse barrier. A determined mouse can chew through standard foam in hours. Use it as a secondary layer over copper mesh or hardware cloth, not as the primary seal. It fills irregular voids well and adds insulation value, but only after a chew-resistant layer is already in place.
Pest-rated foam products exist, but even those labels recommend pairing the foam with physical barriers for reliable results. The foam keeps air out. The metal keeps mice out. You need both.
Sanitation and storage habits that make your home less of a target
Closing off the food sources mice count on
Dry pantry goods stored in cardboard or thin plastic are accessible to mice without much effort. Moving them to sealed glass, hard plastic, or metal containers removes one of the main reasons mice stay once they’re inside. Pet food left out overnight is a reliable attractant; pull bowls after feeding and keep bulk bags in sealed bins. Bird feeders close to the house pull mice in from outside, so store seed in sealed containers and clean up scattered seed around the base of feeders consistently.
Compost kept indoors or in open containers near the foundation draws rodents in as well. Use a sealed bin and take scraps out on a regular schedule. These aren’t dramatic changes, but together they make a home significantly less rewarding for a mouse that’s already made it through a gap in the foundation.
Clutter, moisture, and the conditions mice nest in
Clutter in garages, basements, and storage areas gives mice both cover and material to build nests. Cardboard boxes stored on the floor are especially useful to them. Getting boxes off the ground and reducing overall clutter in these spaces removes hiding spots and makes it easier to spot signs of activity early. Avoid storing firewood directly against exterior walls; it creates harborage close to the structure and can make the path indoors shorter.
Fix leaky pipes and address moisture under sinks. Mice need water to survive indoors, and even minor leaks create reliable sources that keep them coming back. Eliminating moisture is often the step people skip, but it’s one of the more effective ways to make an indoor environment less hospitable.
Trapping safely when mice are already inside
The safest and most effective trap types for homes with kids and pets
Enclosed electronic traps are the strongest option for most households. The kill mechanism is housed inside the unit, so there’s no exposed snap or accessible bait for children or pets to encounter. Covered snap traps placed inside tamper-resistant bait boxes work well too, especially in utility areas, under sinks, and along garage walls where access is naturally limited.
Avoid loose rodenticide pellets unless they’re secured inside a properly locked station. Loose bait creates a real risk for pets and children, and it also poses secondary poisoning risks for wildlife. Glue traps are the least preferred option: they’re ineffective for population control, don’t give you useful monitoring data, and cause prolonged distress to whatever they catch.
Where to place traps and how often to check them
Place traps along walls and baseboards with the trigger end pointed toward the wall, so the trap forms a T-shape against the surface. Mice travel along walls by habit rather than crossing open floor space, so traps set in open areas catch far fewer. Priority locations include behind appliances, under sinks, along the back of cabinets, near identified entry points, and in corners where two walls meet.
Use peanut butter as bait and keep the amount to about the size of a pea. Too much gives a mouse the chance to steal bait without triggering the mechanism. Check snap traps and electronic traps every one to two days. A fired trap that sits too long stops working and creates a hygiene issue.
When the problem calls for a professional
Signs that DIY measures aren’t keeping up
Fresh droppings appearing after traps have been active for several days signals a population larger than surface-level trapping can address. Scratching sounds inside walls or ceilings, chewed wiring or insulation, and evidence spread across multiple rooms at once all point to an established infestation, not just a scout or two testing the perimeter. These aren’t situations where a couple more traps will resolve the problem.
If you’ve sealed the visible entry points and the signs keep returning, mice are finding access somewhere a standard inspection missed. Professionals use a different process that covers areas most homeowners don’t check, including inside wall cavities, beneath the structure, and in the attic. Missing one or two entry points can make everything else you’ve done ineffective.
What a professional rodent inspection actually involves
A professional rodent inspection covers the full structure, not just the obvious exterior spots. The goal is to identify exactly where entry is happening, whether at the foundation level, the roofline, or around utility penetrations, and to address those points with commercial-grade exclusion methods. That means checking inside wall cavities, under the structure, and throughout the attic, areas that a standard DIY walkthrough typically misses.
For homeowners in the Kansas City metro wondering how to stop mice from getting into their house this winter, Rock Pest Control provides rodent inspections with fast turnaround and treatment plans built around what’s actually happening in your specific home. The process includes identifying entry points, sealing them properly, and monitoring to confirm the problem is fully resolved. Reach out to get a free estimate.
The bottom line
A mouse getting into your home this winter isn’t bad luck. It’s the result of accessible gaps, available food, and conditions that make the inside of your home more comfortable than the outside. All of those are fixable, and most of the work is straightforward once you know where to look.
Start with a methodical inspection. Find the gaps, seal them with the right materials using proper rodent exclusion techniques, and remove what’s attracting rodents to the property in the first place. If trapping is needed, choose options that are safe for your household and check them consistently. Most homeowners who work through these steps see a real difference without needing to go further.
But if the problem is already established, or if it keeps coming back after your own efforts, that’s the point to stop guessing and call someone who handles rodent problems across the Kansas City area every single day. Stopping mice from getting into your house this winter is a manageable job; it just has to be done right.
Frequently asked questions
Start with a full perimeter inspection using the 1/4-inch pencil test to find gaps. Seal small holes with copper mesh and caulk, larger openings with 1/4-inch galvanized hardware cloth, and masonry cracks with mortar or concrete patch. Remove food sources and clutter that give mice a reason to stay. If mice are already inside, use enclosed traps placed along walls near entry points and check them every one to two days. If the problem persists after sealing and trapping, contact a pest control professional for a complete rodent exclusion inspection.
Mice increase shelter-seeking behavior as outdoor temperatures drop into the 40s and 50s°F at night. They remain active year-round but intensify scouting for warm, sheltered spots as fall sets in, which is why late September through November tends to be peak entry season in the Kansas City area.
Yes. Standard expanding foam is not a mouse barrier on its own. A determined mouse can chew through it in a matter of hours. Always use copper mesh or galvanized hardware cloth as the primary seal, with foam added only as a secondary layer to fill gaps and improve insulation.
Peanut butter is reliable and widely recommended. Use a pea-sized amount, enough to attract the mouse without giving it room to steal the bait without triggering the trap. Check traps every one to two days and replace bait that has dried out.